
One thing about posterior uveitis is that without microscope and imaging technology, diagnosing and managing the disease would be nearly impossible. It’s never lost on me (or my insurance bill) how these advanced cameras let the outside world in on what is going on in the back of my eyes.
When I see a machine like this one, I see beauty in the technology that is allowing my doctor and me to preserve my vision:

A brief definition of tools, tests, and terminology can be found here.
This post is a summary of the imaging I get done every 4-6 weeks when my eyes are active.
Fundus photography
A fundus camera is basically a microscope with a camera attached which photographs the back, interior part of the eye when the eye is dilated.
“Fundus photography documents the retina, the neurosensory tissue in our eyes which translates the optical images we see into the electrical impulses our brain understands. The retina can be photographed directly as the pupil is used as both an entrance and exit for the fundus camera’s illuminating and imaging light rays,” according to the overview excerpted from Saine and Tyler’s Ophthalmic Photography, as posted on the Ophthalmic Photographer’s Society’s website. The page contains a detailed description of the process.


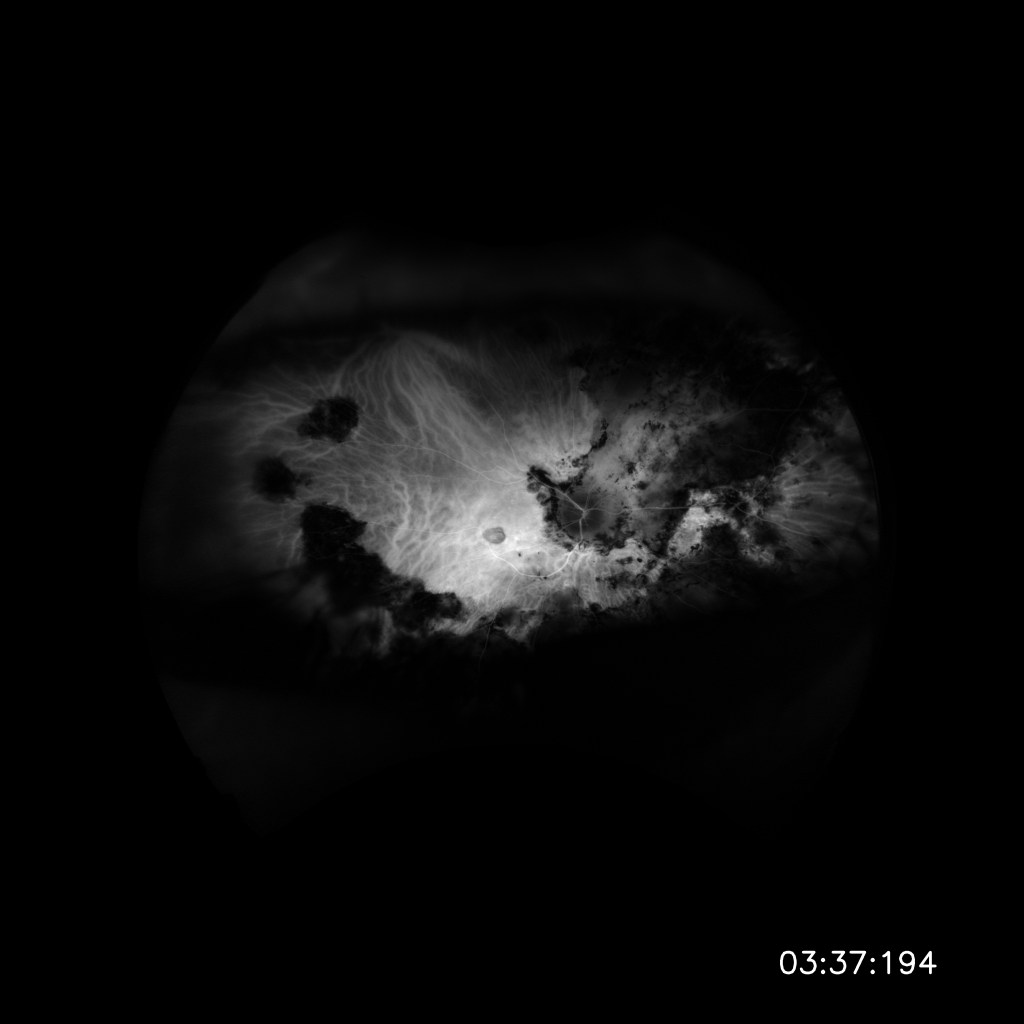
Bottom Image: My right eye with tons of lesions and scaring from past inflammation due to uveitis. These are the areas that I cannot see through when they are in my field of vision. (8/28/2020)
Fundus photography is a valuable technology. Photographs can be used for comparisons from visit to visit and year to year which enables doctors to notice even minute differences inside the eye that may not be noticeable by simply looking at current conditions. Photographs also leave less room for details lost to memory, interpretation and error in note-taking. Although there is, of course, still room for artifacts of the images, shadows, or simply that angle and magnification are not always easy to replicate.
Angiography
Fundus photography of the vessels in the retina can be done with different filters or with specialized dyes, which is called angiography (“to write or record vessels”). Angiography is used to diagnose conditions such as choroidal neovascularization. The dye is injected into an arm vein of the patient and then retinal photographs are taken.
Intravenous fluorescein angiography (IVFA) uses a dye called sodium fluorescein which fluoresces in yellow-green and produces high contrast in the vessels so to see enlarged or leaky vessels in the retina. Indocyanine green (ICG) is another type of dye but fluoresces in the infrared range which makes it easier to see vessels even when there is fluid or hemorrhaging around the area. It is used to highlight the choroid. Both dyes are highly concentrated and will take about a day to pass through your system (i.e. expect neon urine). Angiography is not recommended while pregnant.

Optical Coherence Tomography
Optical Coherence Tomography (OCT) uses light waves to document a cross-section of the tissue layers of the retina. This test enables your doctor to map and measure the thickness of the layers and note any irregularities. Like fundus photography, OCT is non-invasive, and in my opinion, is much easier on the eyes due to the lack of flash and the fact that you can blink at any time during the exam.
I’m fortunate to go to the Karalis Johnson Retina Center at the University of Washington Eye Institute, which is not only a clinic but a research facility with the latest technology. The Retina Center recently opened in a new location with new imaging equipment and the difference is night and day in terms of eye fatigue from having photos taken. The flash is so much less bright. This makes it easier to keep eyes open to take the photos. Technicians are looking for photos at angles and magnifications comparable to those previously taken.

Want to learn more?
The Optos Virtual Showroom is kind of a fun, interactive website if you want a look at what a $200,000 camera looks like and the kinds of photographs it produces!
Read: Advances In Imaging of Uveitis by Alessandro Marchese, et al. (Jan. 2020) http://doi.org/10.1177/2515841420917781.

nice touch having personal pics with a clear explanation.
LikeLike
Thanks!
LikeLike